Page 18 - Workswell Catalogue
P. 18
Application - Laser welding

    17
          SURFACE TEMPERATURE MONITORING DURING CONTOUR LASER

          WELDING OF PLASTICS


                                                                                  Welding of plastic parts is now-
                                                                                  adays  a  very  used  technology
                                                                                  in  the industry for permanent
                                                                                  joining parts together. There are
                                                                                  several  types  of  plastic  welding
                                                                                  technologies: hot body welding,
                                                                                  hot  gas,  friction  and  ultrasound
                                                                                  but also laser welding.

                                                                                  Laser  beam  welding  is  advan-
                                                                                  tageous  for  welding  very  small
                                                                                  and narrow plastic parts due to
                                                                                  the size of the laser beam. When
    Automation
                                                                                  placing several laser beams side
                                                                                  by side we can create any shape
                                                                                  and size of the welded contour.
                                                                                  The laser  beam  passes through
                                                                                  a transparent part of the plastics
          and stops at the base part. At this point, the joint begins to heat until the two parts are joined together. The process
          needs to be monitored to maintain a constant and long-term weld quality.


            SETTING OF THE ASSIGNMENT

            One of the leading automotive companies, Xxxxx, focuses on innovative solutions for compression-ignition and
            combustion engine support systems. In this case, the entire contour of the weld needed to be monitored when
            welding plastic parts of the DC motor case to reach the desired temperature and thereby to ensure that the
            weld is tight. The objective is, among other things, to achieve homogeneity throughout the weld contour to de-
            tect a damaged laser beam in the welding head and therefore to prevent the production of other non-compli-
            ant pieces. The data from each measurement were sent to the data archiving database for each specific piece.


          SOLUTION OF THE ASSIGNMENT
          To address the application, the ThermoInspector thermal imaging system was used, which is primarily intended
          for the applications monitoring production processes, monitoring temperature stability and homogeneity during
          processes, input – output temperature monitoring, etc., and where up to 4 WIC thermal imaging cameras may be
          connected simultaneously.

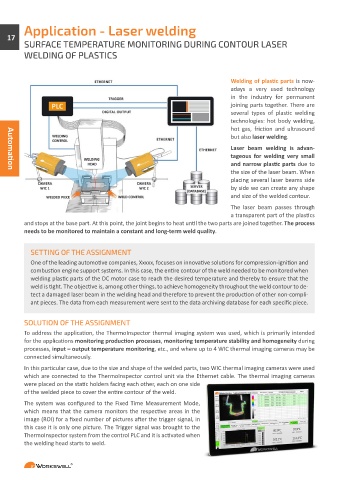
          In this particular case, due to the size and shape of the welded parts, two WIC thermal imaging cameras were used
          which are connected to the ThermoInspector control unit via the Ethernet cable. The thermal imaging cameras
          were placed on the static holders facing each other, each on one side
          of the welded piece to cover the entire contour of the weld.
          The system was configured to the Fixed Time Measurement Mode,
          which means that the camera monitors the respective areas in the
          image (ROI) for a fixed number of pictures after the trigger signal, in
          this case it is only one picture. The Trigger signal was brought to the
          ThermoInspector system from the control PLC and it is activated when
          the welding head starts to weld.

